
Alice in Wonderland: A Textural Journey with Perfect Paints
- Mar 27, 2024
- 3 min read
The papers in this collection are perfect for fussy-cutting, with whimsical and colorful designs that bring the story of Alice to life. Whether it's the Cheshire Cat's mischievous grin or the Mad Hatter's top hat, each element is full of charm and detail. And with the addition of molded clay pieces, the projects truly come to life, adding a touch of magic and wonder.
But it's not just about the visuals, Perfect Paints and Texture mediums also add a tactile element to the projects. The paints have a smooth and creamy consistency, making it easy to apply and blend, while the texture mediums add a dimensional feel.
It's like adding a whole new layer to the paper, taking it from flat to fabulous. And the best part is, Perfect Paints mediums are so versatile that they can be used on a variety of surfaces, from paper to wood to fabric.
I am so excited to my layout and cards with you and hope that they will inspire others to add a bit of whimsy and wonder to their own crafting projects.
Because in the end, that's what Alice in Wonderland is all about - letting your imagination run wild and creating something truly unique and beautiful.
Supplies Used:
Perfect Paints: Shimmering Acrylic Paint Red Wagon | Peacock Blue | Bright Gold | Northern Lights Perfect Paints: Polishing Plaster Frosted Pine | Doves Wing Paper & Molds: Prima Marketing, Inc. Card Stock: Joanns
Paint Brushes Fine Point Scissors Scrapbook Adhesives Foam Squares Beacon Adhesives 3-in-1 Liquid Adhesive
First, we will start with the scrapbook layout:

Fussy Cut the images that you want to use for the card and layout. Remember we will be adding cut images over the same flat images on the paper below it.

Close-up of the dimension made with fussy cutting the images on top of flat images and using foam squares to give it height.

An image showing the layers that were created on this layout:

To get the dimensional texture on the top of the mushrooms you will blend the Polishing Plaster Doves Wing with the Red Wagon and Peacock Blue. The Red Wagon will be used on the top of all the mushroom cut images except a few smaller individual ones. The Peacock Blue will be used for the bow on the hat. For the grass at the bottom, I used Polishing Plaster Frosted Pine to create the texture of the grass.


Then we take the same techniques to create a matching set of cards:

Completed "Lost Bunny" Card
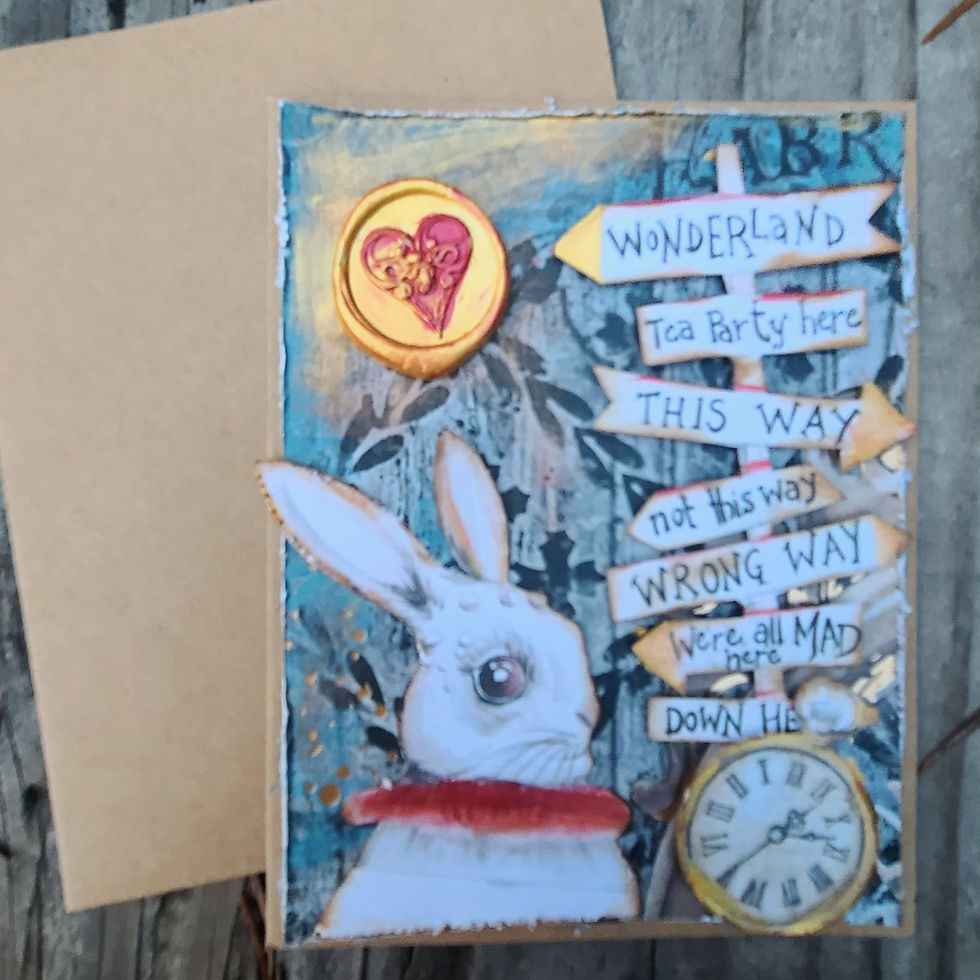
Painted mold using Red Wagon and Bright Gold. Bright Gold Shimmering Acrylic paints accents throughout the card with a touch of Red Wagon on the bunny's scarf.

Completed "Forever" Card

Painted the heart mold with Red Wagon, then used the mushroom top technique we used on the scrapbook layout giving it dimension with Polishing Plaster and Bright Gold. Use Polishing Plaster, Dove's Wing to create the white texture at the bottom of the mushroom cap.


Completed "Lock & Key" Card

Paint the keyhole and key with Red Wagon and Peacock Blue, and add a dash of Bright Gold to give it a bit of patina.

I added the Shimmering Acrylic Paints to the hearts and edges of the signs.

I hope you will give this technique a try and elevate your cards and layouts to the next level!
Candy Rosenberg


Comments